 Perhaps the most ambitious musical project to date, the instrument with no name is a seventeen stringed instrument of sympathetic proportions.
At this point I will randomly go on about a few of the construction mishaps of this wonderful instrument.
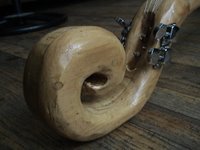 I carved the head and neck out of a few pieces of pine I had laying around the space room. I know, pine is not the best wood to use, but when one is using junk and garbage as materials, one can not be that picky. I must say that before I started carving the head I thought to myself, how hard can it be to carve a great large swirl out of pine? Hell, I’m the king of swirls. It was only a few short hours later that I realized being king was a lot tougher then it looks. The swirl looks a bit misshapen and the overall effect give it that sci-fi fantasy look that only belonged to the Seventies. Maybe I should airbrush a topless woman ridding a unicorn somewhere on the instrument. What could I do? When the swirl calls I have to answer. That was just part of the deal.
Moving right along, I will now quickly go over some of the other materials I used in building this instrument. As you can see from the images I have once again used a salad bowl for the resonance
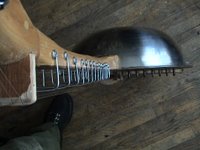 chamber of the instrument. I don’t think I’ll ever get tired of the old metallic salad bowl bit, for one they sound great and are unlike anything I could build. Secondly, they are dirt cheep and they can be found in just about every second hand store. Next on my list of materials often used would be the seventies style wood paneling. This material has certainly come up in the ranks over the past few years, now whenever I am on my way to a new job site I hope and pray that we will be tearing apart some bodies Grandparents basement, Though saying that now I realize that it is not in fact Grandparents that have these kinds of basemental decorative ideas, but a few of our own Parents as well, and that subject will be left at that. Now back to the paneling. This stuff is great, I like it for so many reasons, and now I’m going to list a few. First and most obvious is the price, you can’t beat free. Next, this is a very easy material to work with, easy to store, easy to cut, easy to attach to salad bowls, and lets not forget about its greatest selling feature, the thickness of the paneling itself. This stuff is very thin, which means very light, which is good. If you do find that it may be too thick you can always take up layers of the board. As you can see in some of the images this has already been done to certain sections. I am now officially board with material talk.
OK moving on to some of the things that pissed me off about this new piece. Let’s see, off the top of my head I would have to say that putting the harp in, creating the two bridges, and figuring out how to fret this beast were the three worst. They were so bad that I put this instrument off to the side for just over three months. I’ll start with the harp part of it, because that was my first and most damaging road block. I had just come off this three day tuning peg binge, using the pegs I had salvaged off an old harp from an uprights pianos sound board. Well little did I know before I started this binge was that the drill bit I was using for the peg holes was just a bit too big. What can I say, countless numbers of holes drilled meaninglessly into countless numbers of experimental instruments. Needless to say I was devastated when I discovered the errors of my ways. Since then I have been seeking counsel for my addiction and restrict my tuning peg drilling to one instrument at a time.
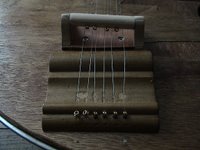 Now my next problem was all to do with the construction of the two bridges. The first bridge was for the sympathetic strings so I could mount it close to the body. The second bridge however had to be raised up about an inch and a half (I know, I’m Canadian, I should be using metric) if I were to do this I would somehow have to compensate for the tension and height then all I could do was hope and pray that the Gods of all instruments messed up would smile upon me. It was a grueling few days, but in the end I came out victorious. Though visually I and not one hundred percent sold, on a functional level I was more then happy. This is where many of my problems lie in experimental instrument sculpting. Do I settle for function or design? Moving right along to my final and perhaps most daunting task and that was the fret board. The frets are set up like an acoustic guitar which is easy enough, but how in the name of Zeus am I going to have them raised up in order for the sympathetic strings to successfully run underneath? All this time wasted thinking about how I could do it. The sleepless nights, the fights with my loved ones, the unexplained bruising I discovered on my legs one day. All of this was a direct result of
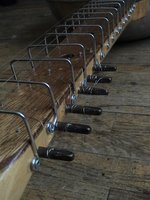 not even knowing where to begin with this problem, while all the time it was laying right in front of me, quite literally it was right in front of me the whole time. In front of me and in my way most of the time. It was my fret stick, I know, I know. We all have one, but most of us are afraid to admit it. Well I’m not, in fact this fret stick saved my fragile eggshell mind. You see all I had to do was lay this fret stick on top of the neck of the instrument, after that everything was easy, bent up a bunch of aluminum rods and screw them right into the neck over top of the fret stick, all the frets in place and I was ready to go. The only problem I had now was getting that damn stick out from under them, but that’s a story for another day.
This could be my longest blog entry ever. If you have gotten to the bottom of this and have not fallen asleep do to boredom you are truly a crazy person, but that makes me love you all the more.
Here are some comments that were left for this instrument.

hey your site is neat. it's too bad i can't listen to a sound clip of this. you know you can do that free audio posting thing blogger offers with your cellphone at least.
thanks for sharing
brian